
With this simple guide we see how to deploy TIBCO Activespaces 4.6 and FTL Server 6.5 along with Monitoring via InfluxDB and Grafana, on a pre-existing cluster controlled by SUSE Rancher 2.6.
For this guide only, we will deploy TIBCO Activespaces and TIBCO FTL Server on a single node, although 2/3 nodes are recommended. However, the Helm Chart covered in this guide provides a number of replicas and nodeaffinity for a production cluster.
An Excel file for sizing the cluster to perfection can be found here and more product info can be found here.
Why SUSE Rancher?
Rancher is a complete software stack for teams adopting containers. It addresses the operational and security challenges of managing multiple Kubernetes clusters across any infrastructure, while providing DevOps teams with integrated tools for running containerized workloads.

Run Kubernetes everywhere
Unified multi-cluster app management
Rancher not only deploys production-grade Kubernetes clusters from datacenter to cloud to the edge, it also unites them with centralized authentication, access control and observability. Rancher lets you streamline cluster deployment on bare metal, private clouds, public clouds or vSphere and secure them using global security policies. Use Helm or our App Catalog to deploy and manage applications across any or all these environments, ensuring multi-cluster consistency with a single deployment.
Rancher received top ratings for:
- Runtime and orchestration
- Security features
- Image management
- Vision
- Roadmap

More info here.
TBCO Activespaces and FTL onpremise
What Is ActiveSpaces?
TIBCO ActiveSpaces uses the concepts of grid computing to provide a scalable, distributed, and durable data grid. The data grid serves as a system of record to store terabytes of data in an enterprise. ActiveSpaces provides a fast, consistent, and fault-tolerant system that supports a high rate of I/O operations in a scalable manner.
For more information about the ActiveSpaces concepts, see the Grid Computing in ActiveSpaces section.
Benefits of ActiveSpaces
ActiveSpaces offers many advantages as compared with a traditional RDBMS.
The following list highlights the benefits of using ActiveSpaces:
- ActiveSpaces performance and customer experience
- Requires minimum investment because the system scales on low cost commodity or virtualized hardware
- Updates data and systems continually and provides immediate and accurate response
- Supports many hardware and software platforms, so programs running on different kinds of computers in a network can communicate seamlessly
- Scales linearly and transparently when nodes are added (An increase in the number of nodes produces a corresponding increase in the memory and processing power available to the data grid)
- Enables smooth and continuous working of your application without code modification or restarts
- Provides location transparency without the hassles of determining where or how to store data and search for it
- Notifies applications automatically as soon as data is modified
The Workflow for a PUT Operation
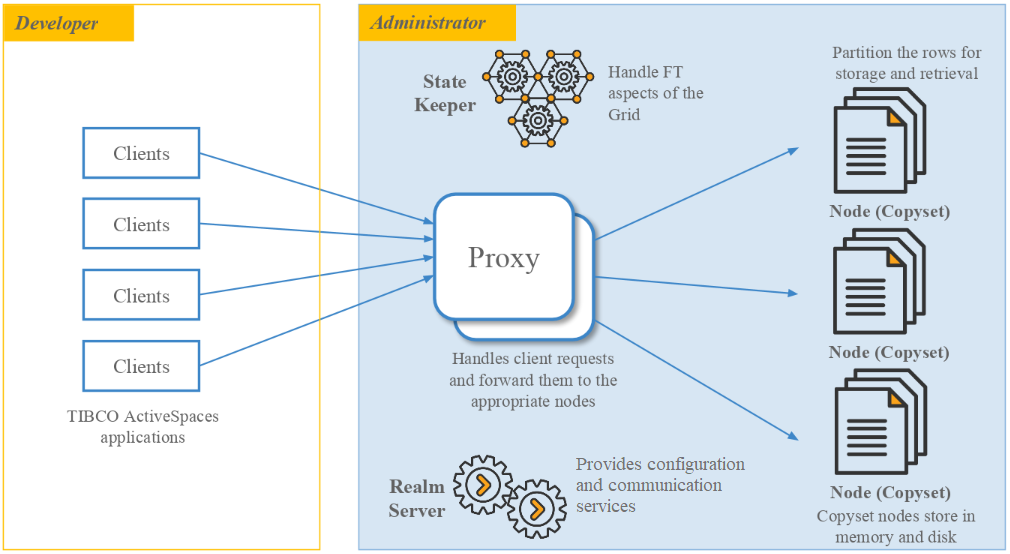
How Is the Data Stored in a Data Grid?
For more info can you click here.
Create Docker Images
Supported Version
- TIBCO ActiveSpaces 4.6
- TIBCO FTL 6.5
- Docker Community/Enterprise Edition should be most recent version.
Prerequisiti
- Install Docker and make your user in Sudoers.
- A K8s Cluster (k3s o RKE2) with SUSE Rancher running.
- Install Helm official.
- Make sure the docker images repositories are accessible for the cluster.
Prepare Local Enviroment
Prepare the local environment using the following:
- A Linux or MacOS machine equipped for building Docker images;
- TIBCO ActiveSpaces v4.6 and FTL v6.5 installation packages are required. The Enterprise Edition or the Community Edition can be used. The Enterprise Edition must be used if configuring monitoring components. Download the EE from edelivery.tibco.com, and the CE at https://www.tibco.com/products/messaging–event–processing Note: All installation files must be Linux!
- The tibdg_docker_4.6_mon.zip. The zip file contains all of the necessary Docker build files:
- Create a new directory
tibdg_docker_4.6; - Unzip
tibdg_docker_4.6_mon.ziptotibdg_docker_4.6; - Unzip the downloaded
TIB_as_4.6.0_linux_x86_64.zipandTIB_ftl_6.5.0_linux_x86_64.zip; - Copy all of the rpm files from
TIB_as_4.6.0/rpmandTIB_ftl_6.5.0/rpmdirectories totibdg_docker_4.6/bin.
- Create a new directory
- Install Docker on the workstation to build the TIBCO AS4 and FTL images, and ensure it is running.
Attachments
Image Creation
Configuration for Monitoring
The FTL ftl–tibftlmonconfig image requires additional configuration before being created. If the monitoring components are not required, this section can be skipped.
Note: A Linux installation of FTL is required for this step.
Use the following to prepare the FTL monitoring configuration component:
- Under the
tibdg_docker_4.6/confdirectory, create the dashboards directory; - From the
$TIBCO_HOME/FTL/current_version/monitoring/conf/influxdb/dashboards, copy all of the json files totibdg_docker_4.6/conf/dashboards; - From the
$TIBCO_HOME/FTL/current_version/monitoring/conf/influxdb, copycreatedb,continuous_queries, andcreate_retentionfiles to thetibdg_docker_4.6/confdirectory; - The
tibdg_docker_4.6/conf/datasource.jsonandmonitoring-in-docker.jsonare configured to usehost.docker.internalfor both the Grafana and Influxdb servers. Change accordingly. If using in Kubernetes, these must be modified to reference the K8 services these servers. A Docker environment variable may also be substituted for the value, and used when running in Docker or Kubernetes.
Image Creation
There is a Dockerfile for each of the ActiveSpaces components, as well as for the FTL Server and monitoring components. All Dockerfiles were built on the Centos8 base image using the TIBCO product rpm packages. If another base image is required, substitute this in the individual Dockerfile.
Note: If the base image used does not support rpm files, then the individual Dockerfile will need additional modification, for the correct installation procedure. This is not covered as part of this document. Additionally, it maybe be possible to make the images smaller by reducing the rpm files in the bin directory to only the required install rpm files for that component.
Once the environment is ready, run run_build.sh to create the seven Docker images.
Note: monitoring components are not required, comment out the build of the three monitoring components.
The images created will be:
- as–operations:4.6.x
- as–tibdg:4.6.x
- as–tibdgadmind:4.6.x
- as–tibdgproxy:4.6.x
- as–tibdgkeeper:4.6.x
- as–tibdgnode:4.6.x
- as–tibdgmonitoring:4.6.x
- ftl–tibftlserver:6.5.x
- ftl–tibftlmonconfig:6.5.x
- ftl–tibftlmongateway:6.5.x
How the images are tagged can be changed by modifying the run_build.sh script. There is also a script delete_build.sh supplied which can be used to delete all images.
TIBCO ActiveSpaces Helm Chart
Introduction
TIBCO ActiveSpaces (abbreviated tibdg for ‘TIBCO Data Grid’) is a distributed, fault-tolerant, key-value store. Helm is a package manager for Kubernetes.
Helm Chart
Official Helm Chart available only after prior approval by TIBCO. Contact us.
The following instructions on preparing the Helm Chart and editing the Values.yaml file are taken from the Official README.md.
Prerequisites
- Kubernetes 1.9+
- PV (Persistent Volume) provisioner support in the underlying infrastructure
- Make sure the ActiveSpaces Docker images are accessible from the cluster. Either the images must be loaded into a common private registry as outlined here, or the images can be loaded on each node in the cluster.
The docker images should be built following the instructions in scripts/build-images.
The scripts/build-images directory also has instructions for creating the xz files which can be loaded with the docker load command if needed.
docker load -i as-operations-4.7.1.dockerimage.xz
docker load -i as-tibdg-4.7.1.dockerimage.xz
docker load -i as-tibdgnode-4.7.1.dockerimage.xz
docker load -i as-tibdgkeeper-4.7.1.dockerimage.xz
docker load -i as-tibdgproxy-4.7.1.dockerimage.xz
docker load -i as-tibdgadmind-4.7.1.dockerimage.xz
As well, the ftl-tibftlserver image must be loaded or built from the FTL installation directory. The minimum version required for this data grid is: 6.7.1
docker load -i ftl-tibftlserver-6.7.1.dockerimage.xz
The images referenced by the chart can be configured, e.g. if a custom registry path is required.
If you are using the Enterprise Edition of TIBCO ActiveSpaces you have the ability to monitor the data grid.
Load the ftl-tibmonconfig and ftl-tibmongateway docker image from the FTL installation. This compressed image is located in the product’s docker-images directory.
docker load -i ftl-tibmonconfig-6.7.1.dockerimage.xz
docker load -i ftl-tibmongateway-6.7.1.dockerimage.xz
Installing the Chart
To install the chart with the release name tibdg-helm, run this command from the directory containing this README:
# helm v2:
helm install --name=tibdg-helm .
# helm v3:
helm install tibdg-helm .
This command deploys ActiveSpaces on the Kubernetes cluster with the default configuration. The configuration section lists the parameters that can be configured during installation.
To view the generated Kubernetes manifest without actually deploying into the cluster, the --dry-run and --debug options can be used:
# helm v2:
helm install --debug --dry-run --name=tibdg-helm .
# helm v3:
helm install --debug --dry-run tibdg-helm .
Uninstalling the Chart
To uninstall/delete the tibdg-helm deployment:
# helm v2:
helm delete --purge tibdg-helm
# helm v3:
helm uninstall tibdg-helm
This command removes all the Kubernetes components associated with the chart and deletes the release.
Configuration
The following table lists the configurable parameters of the ActiveSpaces chart and their default values. More detailed documentation is available in the comments of values.yaml.
| Parameter | Description | Default |
|---|---|---|
asVersion |
The ActiveSpaces verion to use | 4.7.1 |
asVersionMajorMinor |
The Major.Minor ActiveSpaces verion to use | 4.7 |
ftlVersion |
The FTL version to use | 6.7.1 |
gridCreationOptions |
Custom grid creation options | null |
gridName |
Custom grid name. Default used if null | null |
tibdgConfig |
Additional tibdg commands to be run at grid initialization | table create t1 key longcolumn create t1 value string |
externalAccessMode |
The mode of external access, see Enabling Access Beyond the Cluster | null |
monitoringEnabled |
If true, enables a grafana-based monitoring stack. Requires ActiveSpaces Enterprise Edition. See Monitoring | false |
ftlserver.image |
The Docker image for the FTL server container | ftl-tibftlserver |
ftlserver.imageTag |
The FTL server image tag. By default ftlVersion is used |
null |
ftlserver.count |
The size of the FTL server cluster. | 3 |
ftlserver.storageCapacity |
The storage capacity of the FTL server persistent volume | 1Gi |
ftlserver.ports.http |
The http api port of the FTL server | 30080 |
ftlserver.ports.ftl |
The FTL port of the FTL server | 30083 |
ftlserver.storageClass |
The StorageClass for the FTL server PersistentValueClaim | null |
ftlserver.loadBalancerIP |
The FTL server LoadBalancer ip if external access mode is enabled. If null will use the value of tibdgproxy.advertisedIP | null |
ftlserver.resources |
FTL server CPU/Memory resource requests/limits | {} |
tibdgadmind.image |
The Docker image for the tibdgadmind container | as-tibdgadmind |
tibdgadmind.imageTag |
The tibdgadmind image tag. By default asVersion is used |
null |
tibdgadmind.count |
The replica count. | 1 |
tibdgadmind.ports.admind |
The http api port of the tibdgadmind | 30081 |
tibdgadmind.resources |
tibdgadmind CPU/Memory resource requests/limits | {} |
tibdg.image |
The Docker image for the tibdg container | as-tibdg |
tibdg.imageTag |
The tibdg image tag. By default asVersion is used |
null |
tibdgnode.image |
The Docker image for the tibdgnode container | as-tibdgnode |
tibdgnode.imageTag |
The tibdgnode image tag. By default asVersion is used |
null |
tibdgnode.copysetCount |
The number of copysets to partion data amongst | 1 |
tibdgnode.copysetSize |
The number of replicas in each copyset | 2 |
tibdgnode.storageCapacity |
The storage capacity of the tibdgnode persistent volume | 10Gi |
tibdgnode.storageClass |
The StorageClass for the tibdgnode PersistentValueClaim | null |
tibdgnode.resources |
tibdgnode CPU/Memory resource requests/limits | {} |
tibdgkeeper.image |
The Docker image for the tibdgkeeper container | as-tibdgkeeper |
tibdgkeeper.imageTag |
The tibdgkeeper image tag. By default asVersion is used |
null |
tibdgkeeper.count |
The number of state keeper instances to run. Valid values are 1 or 3 | 3 |
tibdgkeeper.storageCapacity |
The storage capacity of the tibdgkeeper persistent volume | 1Gi |
tibdgkeeper.storageClass |
The StorageClass for the tibdgkeeper PersistentValueClaim | null |
tibdgkeeper.resources |
tibdgkeeper CPU/Memory resource requests/limits | {} |
tibdgproxy.image |
The Docker image for the tibdgproxy container | as-tibdgproxy |
tibdgproxy.imageTag |
The tibdgproxy image tag. By default asVersion is used |
null |
tibdgproxy.count |
The number of proxy instances to run | 2 |
tibdgproxy.externalBasePort |
If external access is enabled, each proxy instance is assigned a unique port from externalBasePort up to externalBasePort + count – 1 | 30100 |
tibdgproxy.advertisedIPs |
If external access is enabled, the ip address each proxy advertises. $(NODE_IP) is the Kubernetes node ip address |
$(NODE_IP) |
tibdgproxy.listenPort |
The internal proxy listen port | 8888 |
tibdgproxy.resources |
tibdgproxy CPU/Memory resource requests/limits | {} |
pod.terminationGracePeriodSeconds |
The Kubernetes terminationGracePeriodSeconds to set for each pod. Leave null for default |
null |
grafana.image |
The Docker image for the grafana container | grafana/grafana |
grafana.imageTag |
The grafana image tag. | 7.1.5 |
grafana.storageCapacity |
The storage capacity of the grafana persistent volume | 1Gi |
grafana.storageClass |
The StorageClass for the grafana PersistentValueClaim | null |
grafana.env |
Container environment variables | [] |
grafana.resources |
grafana CPU/Memory resource requests/limits | {} |
influx.image |
The Docker image for the influxdb container | influxdb |
influx.imageTag |
The influxdb image tag. | 1.8.2 |
influx.storageCapacity |
The storage capacity of the influxdb persistent volume | 1Gi |
influx.storageClass |
The StorageClass for the influxdb PersistentValueClaim | null |
influx.env |
Container environment variables | [ "INFLUXDB_HTTP_LOG_ENABLED=false" ] |
influx.resources |
influxdb CPU/Memory resource requests/limits | {} |
tibmonconfig.image |
The Docker image for the tibmonconfig container | ftl-tibmonconfig |
tibmonconfig.imageTag |
The tibmonconfig image tag. By default ftlVersion is used |
null |
tibmonconfig.resources |
tibmonconfig CPU/Memory resource requests/limits | {} |
tibdgmonitoring.image |
The Docker image for the tibdgmonitoring job container | as-tibdg |
tibdgmonitoring.imageTag |
The tibdgmonitoring image tag. By default asVersion is used |
null |
tibdgmonitoring.resources |
tibdgmonitoring CPU/Memory resource requests/limits | {} |
Specify each parameter using the --set key=value[,key=value] argument to helm install. For example,
# helm v2:
helm install --set tibdgnode.copysetCount=5 --name=tibdg-helm .
# helm v3:
helm install --set tibdgnode.copysetCount=5 tibdg-helm .
The above command starts a data grid with 5 copysets.
Alternatively, a YAML file that specifies the values for the parameters can be provided while installing the chart. For example,
# helm v2:
helm install -f values.yaml --name=tibdg-helm .
# helm v3:
helm install -f values.yaml tibdg-helm .
The provided yaml can override some or all of the default values. The following example configures a minimal grid, suitable for running in a desktop environment:
> cat min.yaml
ftlserver:
  count: 1

tibdgnode:
  copysetSize: 1

tibdgkeeper:
  count: 1

tibdgproxy:
  advertisedIPs: 127.0.0.1
  count: 1

externalAccessMode: LoadBalancer

monitoringEnabled: true

# helm v2:
> helm install -f min.yaml --name=tibdg-helm .
# helm v3:
> helm install -f min.yaml tibdg-helm .
Persistence
The FTL server, statekeeper, and node processes of the data grid use the /data path of the container to store data and configuration. The chart mounts a Persistent Volume at this location. By default, the Persistent Volume is provisioned using the default dynamic provisioner of the cluster. You can configure alternative provisioner by specifying the ftlserver.storageClass / tibdgkeeper.storageClass / tibdgnode.storageClass options.
The FTL server and statekeepers primarily store configuration data. The bulk of the storage is consumed by the node processes. Ensure that the storageCapacity options are sized appropriately.
Enabling Access Beyond the Cluster
By default, the data grid is accessible from within the Kubernetes cluster only. To enable external access, the externalAccessMode option must be used. 3 options are available:
null: the default, no external access enabled.NodePort: This enables NodePort services for the FTL server and proxy pods. Under this mode, clients can access the cluster by directly communicating with the Kubernetes cluster nodes on the configured port values (tibdgproxy.externalBasePort,ftlserver.ports.*). N.B. the configured ports must fall within the cluster’s NodePort range (default: 30000-32767).LoadBalancer: This enables LoadBalancer services for the FTL server and proxy pods. The behavior of the LoadBalancer service is cluster dependent. Typically the cluster creates a new LoadBalancer instance native to its implementation, which is used to proxy the internal service. One caveat with this method is that the IP address of the LoadBalancer must be configured (tibdgproxy.advertisedIPs) prior to starting the data grid. This is because each tibdgproxy advertises the ‘external’ IP address to potential clients.
Monitoring
If monitoring is enabled via the monitoringEnabled option, a grafana/influxdb/tibmongateway monitoring stack is deployed alongside the data grid. External access to the monitoring dashboard is governed by the same externalAccessMode used for the data grid. The influx.storageClass configures the provisioner for the persistent volume of the influxdb pod.
Setting Grafana
It is important to set up the Grafana data source well for monitoring via influxdb.
You need to create a new data source by choosing influxdb as the type; set “FTL” as the data source name.
In the HTTP section set as the URL: http://<k8s_service_name_influx>:8086.
Set as Database: tibco.
Set as User: user.
Set as HTTP Method: POST or GET.
Accessing the Data Grid
To verify the data grid is running the tibdg tool can be used to check status. The tibdg tool is part of the as-tibdg:4.7.1 image and can be run in the cluster via the following command:
kubectl run -it --rm --restart=Never --image=as-tibdg:4.7.1 tibdg -- \
    -r http://ftlservers:30080 status
The operations sample can also be run to get and put data and run other operations:
kubectl run -it --rm --restart=Never --image=as-operations:4.7.1 operations -- \
    -r http://ftlservers:30080
The chart creates a DNS entry for the FTL server at domain ftlservers. The default FTL server http port is 30080. Therefore any applications needing to access the data grid in the cluster can use the FTL server address http://ftlservers:30080.
If external access is enabled, the FTL server address becomes http://<node or loadbalancer ip address>:30080
Rancher Ingress
In case you would like a cleaner link, you can set up an ingress on Rancher, according to these directions.