
Before diving into what WSL2 is, how to install it, and how to use it, I would like to add some background information.
Like many of you, I love Linux and its ecosystem but it seems to me that Microsoft does a very good job on its OS and, for some reason, I always end up coming back to it. The ideal thing would be to have the best of both worlds: I’ve tried dual boot, virtualization, but none felt like a full experience, until Microsoft announced WSL.
So, what’s WSL?
WSL stands for Windows Subsystem for Linux, which was nothing more than a compatibility layer for native Linux environments within Windows: “This is what I’ve been waiting for, everything I need without losing compatibility”.
Unfortunately WSL, although very useful, had several shortcomings: all the executions were interpreted, there was no access to all the hardware of the machine, the overall performance was quite poor, etc. In 2019 they announced WSL2, which would no longer be interpreted, it would have the entire native Linux kernel and would be running on Windows at full performance. It seems that having everything I needed is now becoming a reality. It’s not perfect, that’s for sure, but it’s impressive how well it works.
Why WSL2 and not a Linux distro?
“It depends”, that’s the answer. Many of you, due to company policies, will not be able to change the OS of your computer or will be stuck with Windows for using the Office suite or other tools, or even because you feel more comfortable on Windows rather than Linux: I prefer to virtualize Linux on Windows rather than the other way around, so WSL2 has given me the almost perfect solution for my daily tasks (in this case for Docker, K3s and Rancher).
Installing WSL2
Is very simple, but let’s go step by step.
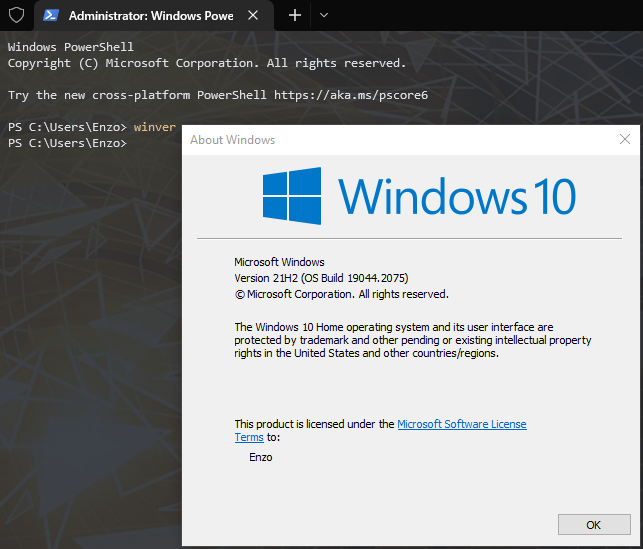 Prerequisite: check if your Windows version is able to use WSL2 (you must have Windows 10 version 2004 or higher). Open a Command Prompt (from now cmd) or a Windows PowerShell (from now PS) as administrator typing winver and pressing enter (from now we’ll assume that all commands we execute below must be launched with administrator privileges).
It will show you a screen like this, where you will see Windows 10 version.
If you comply with the correct Windows version, let’s get to work. If not, it is time to go update Windows.
Step 1: Enable WSL on your system
dism.exe /online /enable-feature /featurename:Microsoft-Windows-Subsystem-Linux /all /norestart
Step 2: Enable virtualization
dism.exe /online /enable-feature /featurename:VirtualMachinePlatform /all /norestart
Now restart the machine.
Step 3: Activate WSL version 2 as default
Open a PS (or cmd) terminal again and execute:
wsl --set-default-version 2
You will see a message similar to:
"For information on key differences with WSL 2 please visit https://aka.ms/wsl2
The operation completed successfully."
Step 4: Download the preferred linux distribution (personally I use Debian) typing
wsl -l -o
The output will be like:
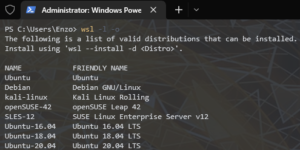
As suggested, now install the distro:
wsl --install -d Debian
The previous command will download the chosen distro and install it. At the end of the installation a window will be opened as in the screenshot below:
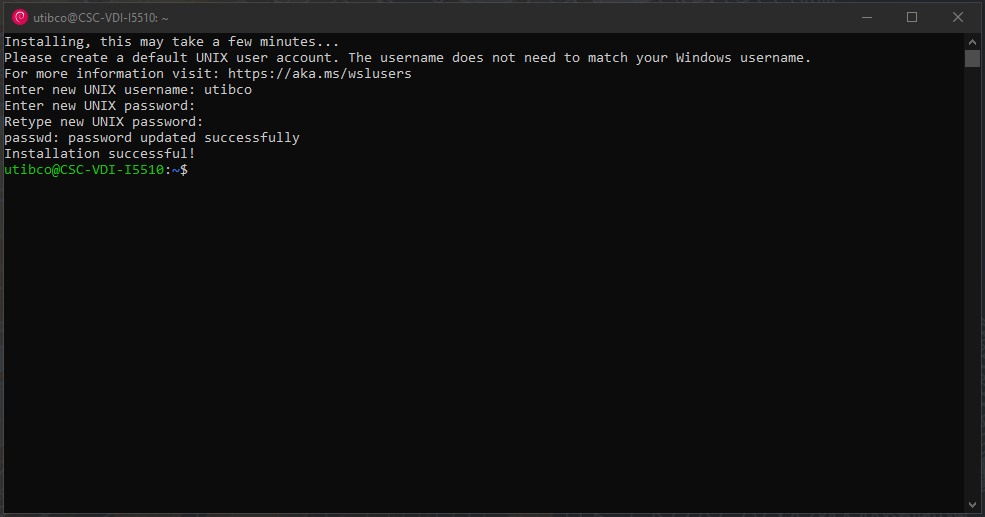
Now enter your username and twice your password and That’s All! Your new linux distro is up, running and ready to use!
Feel free to use the previous window, PS or cmd as your linux terminal (I’ll use the first one).
Conclusions
With these simple steps you will have Debian installed within Windows with its kernel at 100% and you can run all the tools you need, such as Docker natively directly in the Linux kernel (something that before with HyperV was not working for me and that WSL1 did not support).
Installing SUSE Rancher
Installing K3s Lightweight Kubernetes. Easy to install, half the memory, all in a binary of less than 100 MB.
You can find what’s K3s in details at following URL https://docs.k3s.io/ and what’s Kubernetes (K8s) at https://kubernetes.io/.
Launch the installed distro from PS typing:
wsl -d Debian
Install prerequisites:
sudo apt update && sudo apt upgrade -y && sudo apt install curl -y
Step 1: Donwload and install K3s
curl -sfL https://get.k3s.io | sh -
Step 2: Check installation
k3s --version
k3s check-config
Step 3: Lauch the cluster
sudo k3s server --write-kubeconfig-mode 644
Step 4: Verify that cluster is up and running
Open another instance of the WS2 VM and run:
kubectl cluster-info
It will show you a screen like this:

Installing Helm
Helm is the best way to find, share, and use software built for Kubernetes. More about at following URL: https://helm.sh/
curl https://raw.githubusercontent.com/helm/helm/main/scripts/get-helm-3 | bash
Installing Rancher with Helm
Step 1: Configure Environmental Variables
The following commands allow k3s to use Rancher’s configuration files (yaml) and
echo "export KUBERNETES_MASTER=$(grep server: /etc/rancher/k3s/k3s.yaml | cut -c13-)" >> ~/.bashrc
echo "export KUBECONFIG=/etc/rancher/k3s/k3s.yaml" >> ~/.bashrc
source ~/.bashrc
Step 2: Add Rancher latest version repository to Helm then install it
helm repo add rancher-latest https://releases.rancher.com/server-charts/latest
helm repo add jetstack https://charts.jetstack.io
helm repo update
kubectl create namespace cert-manager
kubectl create namespace cattle-system
kubectl apply -f https://github.com/cert-manager/cert-manager/releases/download/v1.9.1/cert-manager.crds.yaml
helm install cert-manager jetstack/cert-manager --namespace cert-manager --version v1.9.1
helm install cert-manager jetstack/cert-manager --namespace cert-manager --version v1.9.1 (change the version number based on installed version)
helm install rancher rancher-latest/rancher --namespace cattle-system --set hostname=<your_wsl2vm_hostname> --set replicas=1 --set bootstrapPassword=<your_bootstrap_password>
Wait more or less 5-10 minutes and meanwhile recover your WSL2 VM IP running:
ip addr show <your_network_interface> | grep -oP '(?<=inet\s)\d+(\.\d+){3}'
Add the resulting IP addresst to your Windows host hostname located in C:\Windows\System32\drivers\etc, replacing the name after the IP with your configured <your_wsl2vm_hostname>
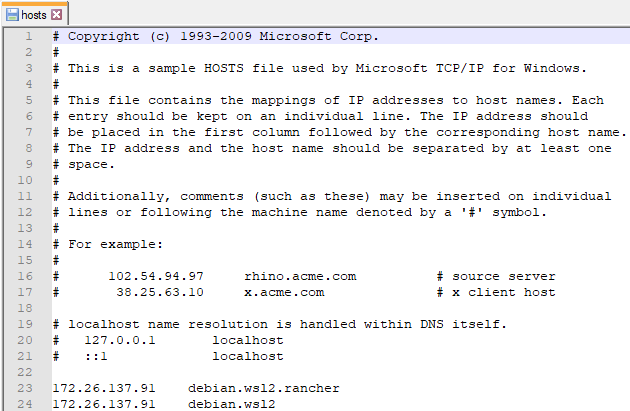
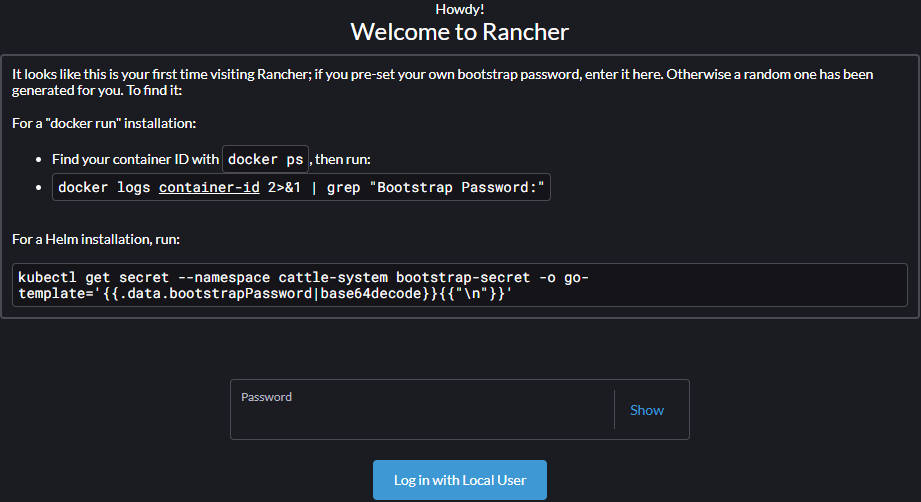
Now open your favourite browser and navigate to https://<your_wsl2vm_hostname>/ (https://debian.wsl2.rancher/ in my case). You’ll reach the Rancher welcome page where you must type the configured bootstrap passowd and…..
HAPPY RANCHERING!!!