“From datacenter to cloud to edge, Rancher lets you deliver Kubernetes-as-a-Service.” (cit)
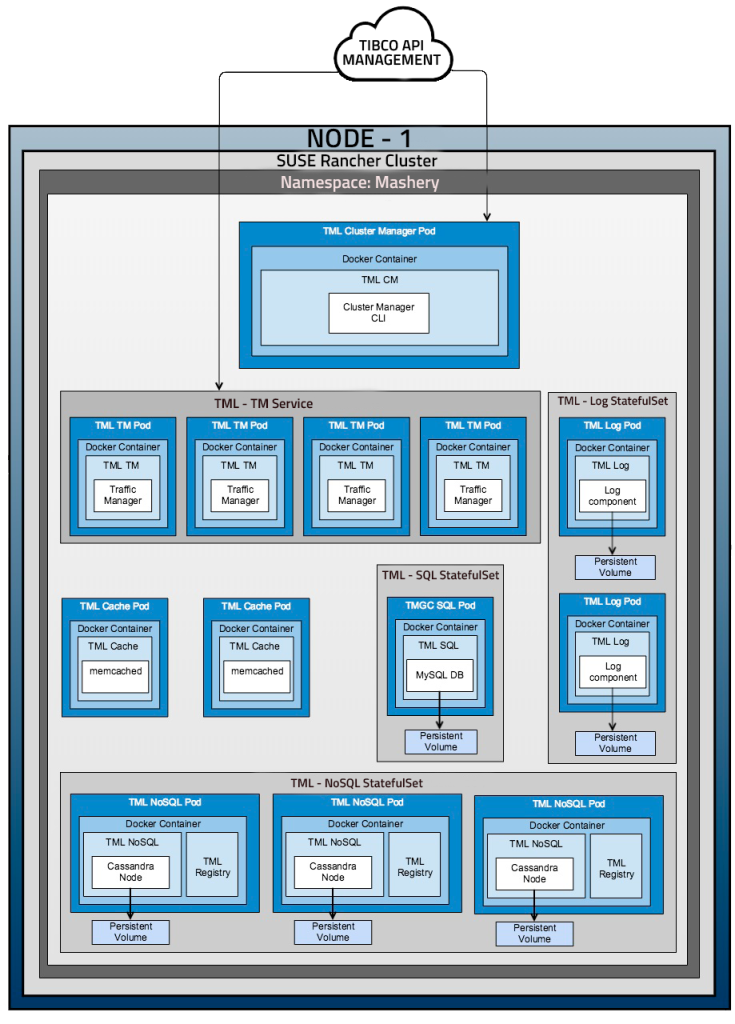
In this short guide you will see how to deploy a recent version of TIBCO API Management to an existing SUSE Rancher Cluster, using the official TIBCO guide and making the necessary changes to adapt it to SUSE Rancher version 2.6, running on a K3S distribution.
For this guide we will use only one node and one replication of TIBCO API Management Local Edition components. For your needs you can always scale nodes and replicas to tailor your cluster to customer needs. With the SUSE Rancher dashboard, you can extend your cluster as needed. But first of all..
Why SUSE Rancher?
Rancher is a complete software stack for teams adopting containers. It addresses the operational and security challenges of managing multiple Kubernetes clusters across any infrastructure, while providing DevOps teams with integrated tools for running containerized workloads.
Run Kubernetes everywhere
Unified multi-cluster app management
Rancher not only deploys production-grade Kubernetes clusters from datacenter to cloud to the edge, it also unites them with centralized authentication, access control and observability. Rancher lets you streamline cluster deployment on bare metal, private clouds, public clouds or vSphere and secure them using global security policies. Use Helm or our App Catalog to deploy and manage applications across any or all these environments, ensuring multi-cluster consistency with a single deployment.
Rancher received top ratings for:
- Runtime and orchestration
- Security features
- Image management
- Vision
- Roadmap
More info here.
Why API Management in Local?
Local Edition is a cloud-native API gateway that can be deployed within a customer’s datacenter or on Cloud platforms. TIBCO API Management – Local Edition supports two mutually exclusive deployment modes, both which allow customers to process API traffic within their on-premises environment:
- Untethered, without any external dependencies
- Tethered, alongside TIBCO API Management
In Tethered mode, TIBCO API Management includes a cloud-hosted Developer Portal, Administrative Control Center, API Reporting and Analytics dashboard.
In Untethered mode, TIBCO Cloud API Management – Local Edition includes a locally deployed Developer Portal and Administrative Control Center.
Logs from TIBCO API Management – Local Edition can be collected and forwarded for downstream reporting and analytics via other externally-available tools.
TIBCO API Management – Local Edition is available to customers for installation in container-based environments.

More info here.
How to deploy TIBCO API Management on a SUSE Rancher Local Cluster
Prerequisites
- Install Docker and make your user in Sudoers.
- Install Kubectl official.
- Install Helm official.
- Install JQ (yum/apt/brew install jq).
- Make the provision for persistent volumes and storage classes for your kubernetes cluster. For configuring storage options, see Dynamic Volume Provisioning at Kubernetes documentation.
- Make sure that your docker images repositories are accessible for the cluster.
- A Rancher’s RKE or k3s Cluster running on your Linux Machine. (You can follow this official guide).
- Create StorageClasses with
rancher.io/localpathas provisioner or any other provisioner (Like Longhorn o Portworx) if you want.
Build images
To build the Docker images needed for the full TIBCO API Management Deploy, you can follow the uffficial guide, starting here.
Deploy on Rancher
First of all copy the deployments folders and files needed. Launch this command to copy files and folders from tml-installer docker container running:
docker cp tml-installer:/var/jenkins_home/docker-deploy .
Navigate to the folder /docker-deploy/onprem/k8s/ on the host (in the new folder “docker-deploy”). You need to update the reference manifest deployment file manifest-single-zone.json for customizing your deployment.
Modify the manifest-single-zone.json
Change this fields:
"tml_cluster_name": "Local Edition Gateway Reference Cluster","tml_cluster_mode": "untethered","tml_zones": ["your cluster name"],"tml_image_registry_host" : "your repository host","tml_image_repo": "your repo images","tml_reporting_enabled": "true or false","k8s_storage_type": "local-path",or any type of storage that you prefer"k8s_storage_provisioner": "rancher.io/local-path",if you choose Default StorageClass for K3S distribution"k8s_deploy_namespace": "your namespace",Eg. “mashery“
The rest you can leave it as is, or change it as needed.
Proceed with deployment
Modify all the necessary files for the Deployments.
In the folder manifest-single-zone launch this command:
./compose.sh manifest-single-zone.json
In the, just created, new folder you have to launch this commands:
export KUBECONFIG=<path to kubeconfig>
./create-tml-namespace.sh
./create-tml-cluster.sh
Usually the typical Kubernetes path on a Linux RHEL/CentOS 8 distribution is:
/home/user/.kube/config
Open your Rancher Dashboard and check deploy.
Conclusion
In the coming weeks you will see how to Deploy TIBCO API Management Deploy through a Helm Chart, and many other TIBCO’s product on a SUSE Rancher’s Kubernetes cluster.
For any question, you can contact us, here.
